UITableView has Plain and Grouped style. When you use grouped style top cell will have upper corners rounded, middle cell don’t have any of corners rounded and bottom cell have lower corners rounded. I’ll show you how to customize UITableView grouped look, so you’ll need 3 cell images: top, middle and bottom image. You’ll also need fourth image in case there is only one cell in section, but you can easily add this by yourself later.
Images I use you can download from this link.
Create some new project, add UITableViewController and define Grouped style for UITableView in Attributes inspector. In my project I also defined background color “Ocean” for table view.
After you define how many sections and rows there will be in table view, set up cells in cellForRowAtIndexPath method. I use UITableViewCell with default style: UITableViewCellStyleDefault. Set text label background color to clear color, set alignment to center, text color to white and set selection style to none.
// text label transparent background
 cell.textLabel.backgroundColor = [UIColor clearColor];
 // text alignment center
 cell.textLabel.textAlignment = UITextAlignmentCenter;
 // text color white
 cell.textLabel.textColor = [UIColor whiteColor];
 // cell selection style none
 cell.selectionStyle = UITableViewCellSelectionStyleNone;
For each cell define some text to display:
cell.textLabel.text = @"cell text".
Images I use have height 50 pixels and heightForRowAtIndexPath method should return same height. When you set up some other images don’t forget to change this value if those images will have different height.
-(CGFloat)tableView:(UITableView *)tableView
 heightForRowAtIndexPath:(NSIndexPath *)indexPath
 {
 // row height
 return 50.0f;
 }
Now we need to check is our cell first in section, last in section or some cell in between and based on that we’ll display corresponding image. We’ll check this in willDisplayCell method. First cell check is easy: it’ll have indexPath.row equal to zero. To check is it last cell we need to compare current indexPath.row with number of rows in current section subtracted by one. All other cells are in between of first and last cell.
-(void)tableView:(UITableView *)tableView
 willDisplayCell:(UITableViewCell *)cell
 forRowAtIndexPath:(NSIndexPath *)indexPath
 {
 // cell background image view
 UIImageView *background;
// first cell check
 if (indexPath.row == 0) {
 background = [[UIImageView alloc] initWithImage:
 [UIImage imageNamed:@"top-cell.png"]];
 // last cell check
 } else if (indexPath.row ==
 [tableView numberOfRowsInSection:indexPath.section] - 1) {
 background = [[UIImageView alloc] initWithImage:
 [UIImage imageNamed:@"bottom-cell.png"]];
 // middle cells
 } else {
 background = [[UIImageView alloc] initWithImage:
 [UIImage imageNamed:@"middle-cell.png"]];
 }
 // set background view
 [cell setBackgroundView:background];
 // release image view
 [background release];
 }
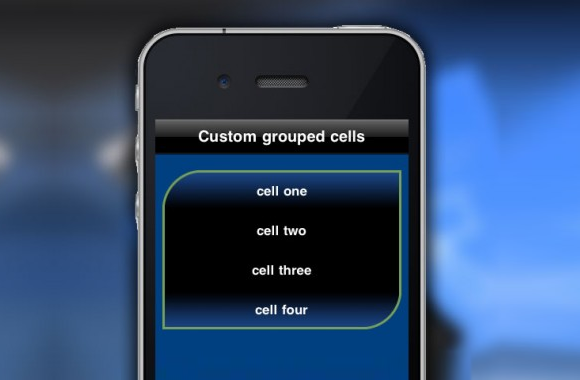
Final result will look like this:

If there is only one cell in section we’ll need to show forth image that will, in this case, have upper left and lower right corner rounded. You can now easily check is there only cell in willDisplayCell method using [tableView numberOfRowsInSection:indexPath.section] value.
Thanks for reading!
Nice! Can I download the code? Not only the images.
That works if you’re always using the dalfuet UITableViewCells, which have a built in textLabel.However, often programmers use custom UITableViewCells, where the title for the row would be in a different UI element. Since BeautifulTableViewHelper is meant to be a generic reference, it would be safer not to make that assumption.But for your own projects, if that assumption is safe to make then go for it! :]
I am extremely impressed with your writing skills and also with the layout on your blog. Is this a paid theme or did you modify it yourself? Either way keep up the excellent quality writing, it is rare to see a nice blog like this one today..
Thanks for the reply!I was actually able to gahetr information directly from the cell using a handy little function I found:- (void)tableView:(UITableView *)tableView didSelectRowAtIndexPath:(NSIndexPath *)indexPath{UITableViewCell *cell = [tableView cellForRowAtIndexPath:indexPath];NSLog(@ TEXT: %@ , cell.textLabel.text);}I put that right inside the FavoriteGamesTable.mm file in case anyone else was curious.Thanks!P.S. Keep the tutorials coming, doing a great job.
Great job, I was doing a google search and your site came up for homes for sale in Altamonte Springs, FL but anyway, I have enjoyed reading it, keep it up!